
What you'll need:
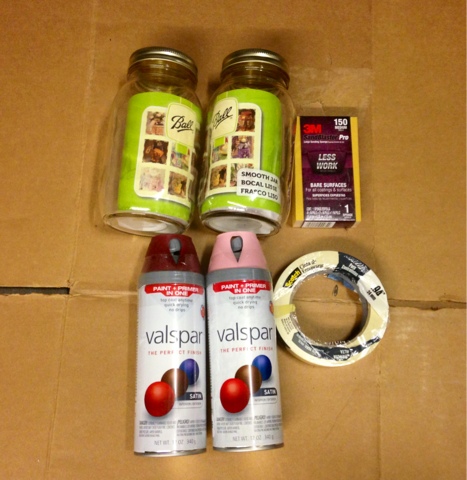
I got the mason jars from Michaels, the tape, spray paint, sanding bar and tape from Lowe's. Michaels had spray paint; however, it was $11.99 a bottle which is why I went to lowes.

Two mason jars - 2.99 ea.

Sanding sponge - 2.99

Scotch painters tape - 1.99

You could also use other widths of painters tape and an exacto knife would come in handy! I had another roll of larger width tape and an exacto knife at my house. Before you get started, lay some something down (a trash bag or cardboard box) so when you spray paint it doesn't get all over your floor. I did this project in my garage, I wouldn't recommend doing it in a living room or kitchen.


Step 1: take your first mason jar and your sanding sponge. Start sanding the glossy surface off of the mason jar. The reason you need to sand some of the gloss off of the jar is because it will make the color and spray paint stick a lot better!


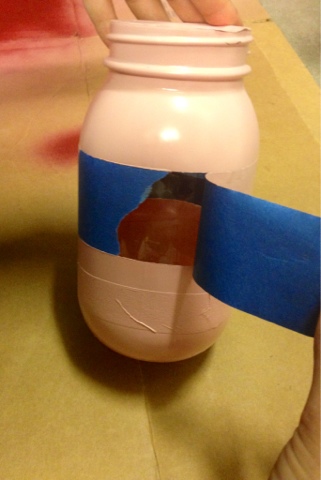
Step 2: take your tape and lay it out on your mason jar in the design of your choice. Be sure to brush out all of the bubbles so when you start to spray paint, the paint doesn't drip into the bubbles and make the lines uneven!


Step 3: tape off the top of the mason jar to ensure that the spray paint doesn't leak inside of it while you're spraying the jar. An exacto knife will make the cutting a breeze!


Step 4: start spray painting! This part was my favorite, it was so much fun! For some reason, I decided to lay the mason jar down to spray paint because I thought the paint would look cleaner that way but it was just troublesome because I couldn't get the side that was laying down! Once it dried up a little I picked the mason jar up and began to spray the back side.


Step 5: start to spray the lids to each mason jar while the first jar dries. This part is optional. If you like the gold color of the lids you're more than welcome to keep it that way! Before you start spray painting, don't forget to use your sand sponge on the lids!


Step 6: take your second mason jar and begin making your design on it! Don't forget to brush out the bubbles!


Step 7: start to spray paint the second jar! This time spray painted the mason jar with it standing up and it definitely worked out better.


Step 8: once the paint is FULLY dry, begin to SLOWLY pull off the tape. If the paint isn't dry and if you pull the tape off quick you will not get clean lines. It took about 15 minutes for mine to dry completely.

The first mason jar you spray paint will dry quicker than the first. Once the second one is dry use the same directions as the previous step to remove the tape.

Step 9: put your spray painted lids on! I decided to mix and match! You may have some difficulty fitting the lid on because of the layers of spray paint. If you do, just sand some of the paint off the part of the jar where the lid goes.


Step 10: take your new candle holders and insert some tea lights (or the small candle of your choice) at the bottom. Using a long lighter (ex: one you use for a grill) light each candle and enjoy!


This is what mine looked like lit up in the dark! I loved the outcome and can't wait to try a bunch of different patterns next time!
In total this DIY came to about $23.00 which is GREAT considering one candle holder normally costs around $15.00 and I got TWO for the price of $23.00. Also, another great part is that your candle holder is completely personalized to fit your personality and the project is quick, fun and inexpensive.
I hope you enjoyed today's "DIY" and I hope you have a great weekend!
Do you plan on making your own mason jar candle? Any questions? Comment below!


No comments:
Post a Comment